Saturday, February 25, 2012

updates from the studio

Dear Readers,

I love you all. I really do. Just knowing you are out there, eagerly awaiting my posts (at least, this is how I envision it!), makes me oh-so-happy...and yet, lately, a little sad. Sad because I have not been delivering those posts to you with my regular enthusiasm.

The reason is the same as it has been for awhile now: school. Sometimes it feels like a tired excuse, but it really is the truth. I've had to let go of some things temporarily in order to be able to keep up with school as I creep closer and closer to the finish line. Although I'm not graduating until June, my thesis exhibit work is due in 39 days! That is so soon! Aside from putting so much energy into making the body of work I'll be partially exhibiting, I've also been writing the written thesis, keeping up with the four (Yes...four...I'm a crazy lady!) classes I'm taking, and teaching one class.

I've put regular blogging on hold until April 4--the day I turn in my thesis work, but I'll be around periodically to check in. I thank you for your patience during this time and hope you will continue reading once I do return for good! I have so many ideas running through my head of things I would like to post about here, and things I would like to make that aren't part of my thesis work, and exactly how I am going to expand my Etsy shop this summer...so many ideas and goals that I am really excited about! I just have to keep on keeping on with school right now and put these ideas on the back burner for a few months longer.

For now...just a few peeks inside my studio:

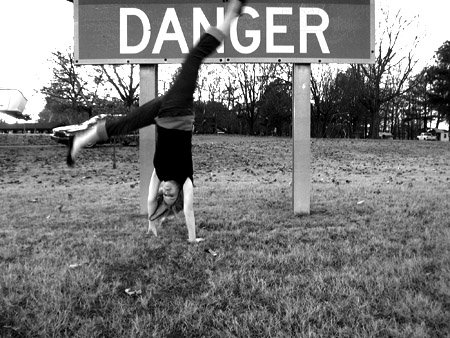
First of all, I'll give you one image. Just one! From my thesis body of work. I don't want to give away all my surprises but I will have you know this is one of my favorites so far, so feel lucky:

It's called Color of the Year. It's based on...the Pantone color of the year, tangerine tango. Yes, I am a color geek! And yes, that is my hand, and I did paint my fingernails as close to tangerine tango as I could manage to find (Pantone should make nail polishes...!?). This image isn't just about the color, but I'll wait to go into more detail about content.

I've been shooting my images with a 4"x5" camera! I'm in love. The sample you just saw above is digital--my film is still waiting for me to process it. Just FYI.

A peek at my random studio items...paint that I used for the Pantone color photograph, a super sweet vintage darkroom timer I recently acquired, only part of my growing vase collection, 12 days of Christmas glass that I was actually drinking from at that moment, film, etc.

And a recent thrift store find (even while busy, I go every Friday morning--it's my special treat!)...a camera bag for $1.91. I have another one just like it that is much smaller that can only hold a 35 mm point and shoot camera (it could hold a digital point and shoot if I had one). This one could hold two point and shoots, my Holga, or my Fuji Instax...

...as modeled here. This is the perfect case for the Instax because the other two sections of the case would be ideal for holding extra film cartridges and developed Instax pictures! I love finding inexpensive vintage camera cases in good condition, because I am trying to expand my collection to fit a variety of needs. It's not always the best option to be lugging around my large camera bag. These small, hard cases, are also great for storage and keeping my cameras dust-free. After my thesis is done I want to spend a lot of time organizing my home studio and coming up with better storage options overall...I am excited to get more use out of my space once I no longer have a studio at school.

That's it for now! Thanks for reading, and I promise I won't be gone forever!

Kristen

Friday, February 10, 2012

tutorial: make your own valentine's day candy!

I love certain holidays. I love Valentine's Day possibly because I love the color red and I think hearts are adorable. An excuse to make cute stuff that's red with hearts on it? I'm in!

For a few years when I was in college, my circle of artsy/crafty friends would have outdoor craft sales a few times a year. One of my favorite traditions is that we'd have one just before Valentine's Day. And I would always make these chocolate hearts to sell. This year I made them to take to a Valentine's Day party that my friends Jessica and Chris are hosting tomorrow. I'm really excited for it! We have been instructed to wear red and pink, and I think I've come up with the perfect outfit. I'll be sure to post pictures.

This candy is delicious, easy, adorable, and at least as affordable as buying a big bag of already-made Valentine's Day candy. I already had most of the supplies I needed, but even if you don't, there's not too much to wrangle up.

- heart molds--I use silicone ice cube trays! You could also buy real candy molds.
- chocolate--I use Ghiradelli chocolate chips. Whatever you do, no almond bark!
- add-ins--I made a batch with espresso beans and a batch with graham cracker pieces. You could stir in anything small.
- tiny bags--I bought mine at a craft store in the jewelry making area.
- colorful cardstock
- stapler

Step 1: Melt your chocolate. If you are using big pieces, chop it up. Melt the chocolate in the microwave in 25 second intervals, stirring in between. Be careful not to overheat/burn it! You could also use a double boiler, if you lack a microwave or want to feel more like a real candy maker.

Step 2: It might be time to stir in your add-ins. It depends on what they are. For my graham cracker pieces batch, I stirred in the graham crackers at this point. For my espresso beans batch, I placed 2 espresso beans in each heart by hand. Use your judgement here.

Step 3: Time to use the molds. I bought these cute ice cube trays several years ago, allured by the idea of making heart-shaped ice. The ice cubes it makes are actually way too small, though--as in, you need to use almost a whole tray for one drink! I kept them around and eventually had the idea to make candy in them! You can always get real candy molds if you can't find any heart-shaped ice cube trays (though I think those are fairly common).

Step 4: Here you see how I dropped two espresso beans into each chocolate. I then pushed them down with my finger so that chocolate would cover them. You also want to shake the trays from side to side to make the chocolate fall down into place and eliminate air bubbles. You don't have to fill each heart completely, depending on how big your tray is. Mine makes a piece of chocolate that just feels slightly too big if I fill it all the way.

Step 5: After pouring the chocolate, I let it cool in the freezer. Otherwise, it takes a long time to become solid (a reason why people use almond bark...but don't do it! just read the ingredients...it's not real chocolate and it doesn't taste like real chocolate).

Step 6: Once my chocolates were cool, I immediately put them in my tiny plastic baggies. I left the baggies unzipped until the chocolates reached room temperature, to avoid condensation on the insides of the bags.

Step 7: I then got to work designing some labels. I did a very simple design using MS Word. It included a dingbat heart shape from the font Webdings, Happy Valentine's Day in a script font I downloaded awhile ago, and a description of the candy (very important warning in this case for those who don't like coffee! eep!). I printed them out on red cardstock, cut them out, folded them in half...

Step 8: ...and stapled them in place. Adorable! Now wasn't that easy?

Now I need to decide if I will make these for all of my students, or buy them pre-made candy...I promised them candy for Monday (we don't meet on Tuesdays)!

How will you be celebrating Valentine's Day?

Monday, February 06, 2012

where does a week go?

Oh, blog friends...where does a week go? I am so looking forward to graduating in a few months (also simultaneously dreading it, for other reasons). The plus side of things: I am learning so, so much, and always moving forward. Downside: I rarely have time to relax, and must do work for school seven days a week! Yikes!

On Saturday, I learned the historic photographic process of wet plate collodion! It was really awesome to learn. At my school, every year the art department awards two post-MFA fellowships to selected artists who have completed their MFA in the past few years. The post-MFA fellows get to teach a few classes and make their work in our facilities for one year. This year one of the post-MFA fellows, Heather, is in the photo area! She specializes in historic processes such as wet plate collodion, and is doing a wet plate collodion workshop in two weeks. I volunteered to help at the workshop, so I got trained on the process a little early with the other volunteers (three fellow grad students).

It's difficult to explain in a few sentences what wet plate collodion is, especially with a wide audience of readers with varying photo knowledge, so if you are interested to know, take a look at the Wikipedia article here. We learned how to mix the chemistry, coat the plates, take and develop the image, and varnish the plate! All in one day. It was a magical, mad science photo time. I took some snapshots of us working but I used a 35 mm camera and haven't developed them yet...sorry! I'm a little behind on everything at the moment, so snapshot development gets pushed to the bottom of my list. I'll post them soon. Also, the whole day was spent mostly just learning the process, and I only made images on two plates, which I then ruined while learning to varnish them. So I'll also post my wet plate collodion images after the workshop. I have some awesome ideas!

Yesterday, I spent half the day cleaning my apartment and half the day doing a take-home essay test. I feel relieved to have both of those things done! My apartment was definitely suffering since I've been telling myself not to worry about it and just to focus on school. It feels so nice and clean now! I am thinking of painting a few rooms new colors soon and I may post pictures here and ask for your opinions. I'm ready for a new look! To anyone else going through a stressful time...if your living space isn't as clean as you usually keep it, do not blame yourself! It will be okay. Just avoid having people over for a few weeks, and focus on your work! I don't feel like we get this permission from many people/places, so I just want to throw that out there for those of you who need it. I felt really guilty that my apartment was so messy when I was so busy, and I think I should have just cut myself some slack! Yes, I function better when my home is clean...but everyone has limits!

Take home essay test...took me a little over 5 hours, and ended up being 7 pages of writing (6-10 was the required length)! Oh my goodness. Did I mention how I can't wait to graduate!? Let me clarify here...I love learning. LOVE IT. I wouldn't still be in school if I didn't. I would just like to have a little more free time on my hands. The class I was writing for is an art history course on the history of video art...it's very interesting! lately we have been learning about guerilla television, which I find very intriguing because I am interested in learning about counter-cultural movements. Check out some footage from this video we watched from this group from the 1970s called the Videofreex:


The Videofreex were an artist collective based out of a small town called Lanesville, New York, where they ran the first pirate television station (for six years!), since Lanesville couldn't pick up any regular channels. Pretty ingenious!

Okay, that's all I have for today...I'm currently dreaming of summer when I'll have time to sew and garden and make things and sit outside in the sun...it will be so wonderful! Until then, school school school! Going out with a bang. That's how it should be.

p.s. Welcome new readers from the Comment Love Challenge!!! Leave me a comment and I will check out your blog!

p.p.s. Millie-cat says, "Get off the computer and play with me, already!"

...and she follows that up with an I-mean-it look!